Astro-Tech 8" f/4 Imaging Newtonian
This is a very affordable and therefore popular imaging telescope. A lot has already been said about this scope, but here I am going to give my take on it. First the basic statistics:
- Type : Newtonian
- Aperture : 200mm
- Focal Length : 800mm
- F number : f/4
- Diagonal Mirror Obstruction : 70mm 35%
Although this is the 6th telescope I have owned, it's the first Newtonian. I bought as a wide field scope for field trips and also as a test bed to try imaging with a Newtonian.
I also purchased a Paracorr STL coma corrector at the same time. The Paracorr STL is designed to screw directly into the STL camera with the correct back focus distance already set.
The first test was to take some flat frames and check for vignetting. The combination was:
- Scope : AT8IN
- Camera : SBIG STL11000M
- Coma Corrector : Paracorr -STL
- Light Source : EL Panel
Immediately the results showed significant vignetting. A quick visual check (backed up by some calculations) and it was clear that the vignetting could be reduced by moving the camera closer to the secondary mirror. The light cone is being clipped too much by the secondary and the bottom of the focuser tube, so I decided to move the focuser and spider towards the front of the telescope.
This modification was rather straight forward. I measured the distance from the camera to the top of the focuser. This distance (less a 1.5 cm safety margin) was the distance I moved the focuser and spider towards the front of the tube. I also double checked the focuser tube / Paracorr would not be inside the tube when at the new focus position.
Once the new position was calculated, I cut out a new hole for the focuser and drilled new holes for the retaining screws. To fill in the old hole where the focuser used to be, I bought a sheet of aluminium about 1mm thick and 30cm x 70cm and placed this inside the tube. This also had the benefit of reinforcing the tube near the focuser. The aluminum sheet is held in place by a generous number of stainless steel screws.
Focusing
At f/4, I found the scope very difficult to focus - there is no margin for error. So I added a RoboFocus which I now consider mandatory for imaging with this scope. The way I mounted the RoboFocus also secures the focuser connection to the tube. This also helps keep the collimation even with the additional weight of the camera hanging off the focuser.
Collimation
Collimating this scope is not easy. The first problem was the screws on the primary. The push and pull screws are too far apart - this means that the locking (the push screw) feels sloppy - and it can actually bend the cell and acts as a collimation screw and move the mirror. I tapped new holes and moved the push screws closer to the pull screws and it's much more responsive.
The secondary mirror had Phillips head screws which I changed to stainless hex screws. I find it easier to make fine adjustments with a Hex key rather than a screw driver. The secondary mirror was also in the mechanical center of the tube, so I cut the plastic behind the secondary and moved the mirror into the correct offset position (away from the focuser) and left the spider vanes in the mechanical center of the tube. Now when the scope is collimated and I look down the front of the tube, the spider vanes are coincident with the center spot and the reflections of the spider vanes. This was not the case initially.
The primary did have a center spot (white donut) but it was not perfectly centered. I replaced it with a catseye hot spot using the catseye template to center it. I then collimated with a catseye site tube/Cheshire and autocollimator.
Then at night, I fine tuned the primary collimation using CCD Inspector full frame analysis.
Mirror Clips
The primary and secondary had large mirror clips which interfered with shape defocused stars a lot. I simply removed the secondary mirror clip - the secondary mirror is securely held in placed by 3 large tabs of double sided tape - so there is no need for the secondary mirror clip. For the primary I mounted the mirror on 3 small dots of silicone bathroom glue. There is plenty freedom for the mirror to expand/contract without distortion and yet no chance of pinching from the mirror clips. I also hope this arrangement will help it keep collimation and improve pointing accuracy.
Paracorr-STL
At f/4 the scope has significant off axis coma and the STL camera has a huge chip to cover so the challenge was obvious from the start. I selected the Tele Vue Paracorr-STL rather than the more popular Baader MPCC in the hope it would provide the right spacing with out any mucking around and also introduce the least vignetting. Out of the box it's close but not perfect. I have found that I needed to put a few shims between the Coma Corrector and the camera. The spacing is unbelievably sensitive. Here is what I have learned about the Paracorr first hand. I'm surprised I couldn't find this anywhere on the internet, so here it is, the low down!
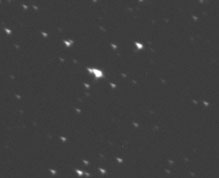
If the Paracorr is too close to the image plane, the stars at the edge are elongated radiating away from the center. Here is an example from the top left corner of an image. (Image center is to the lower right)
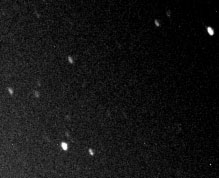
If the Paracorr is too Far from the image plane, stars appear to be elongated in an arc around the center of the image. Here is an example from the top right of an example image: (image center is to the lower left)
To get the spacing right, I experimented with different numbers of spacers made from a plastic milk bottle.